Restoring a vintage mountain bike or upgrading a sturdy touring rig often leads directly to the braking system. Classic cantilever designs offer generous tire clearance and lightweight simplicity that disc setups cannot always match on older frames. Choosing the right brake arms ensures you get predictable friction without frustrating setup headaches.
Modern riders frequently struggle with spongy levers, annoying brake squeal, and uneven pad retraction. We evaluated 3 options for September 2026 to highlight the Best Mountain Bike Cantilever Brakes that solve these common mechanical flaws. Explore our comprehensive technical guides to see how smart hardware choices improve everyday reliability.
Whether you are rebuilding a steel commuter or tackling muddy cyclocross trails, proper stopping power requires dependable components. This guide covers the essential geometry, spring balancing systems, and pad alignment hardware you need before ordering parts.

Selecting the right rim brake hardware requires understanding mechanical leverage, boss alignment, and cable routing. The following criteria break down every functional detail so you can choose components that match your frame and riding style.
Straddle Cable Geometry and Mechanical Leverage
Mechanical leverage in traditional cantilever systems depends heavily on the straddle cable angle and yoke height. A lower straddle cable yoke creates a wider transverse cable angle, which significantly increases mechanical advantage at the rim. Setting the straddle wire too high produces a firm lever feel but reduces actual clamping force against the wheel.
Low profile brake arms react differently to cable geometry than wide profile traditional designs. Wide profile arms provide broad mud clearance and linear response, making them popular for touring and cyclocross. Low profile arms tuck closer to the frame stay, generating greater raw braking power with a lower yoke setting.
A reliable rule of thumb is to set your straddle cable yoke roughly two to three inches above the tire tread. This position balances adequate mechanical advantage with safe clearance beneath your frame or luggage rack. Always verify that your transverse cable cannot catch on knobby tire treads if the main brake cable breaks.
Pad Post Mounting and Toe-In Adjustment Systems
Brake pad attachment styles determine how easily you can eliminate rim squeal and achieve complete pad contact. Smooth post pads use a cylindrical shaft secured by an eye-bolt clamp on the brake caliper arm. Threaded post pads rely on curved spherical washers that let you fine-tune the angular position in three dimensions.
Smooth post pads offer massive vertical and horizontal adjustability across older fork bosses with non-standard spacing. However, setting smooth posts requires holding the pad angle steady while tightening the locking nut, which can test your patience. Threaded post systems hold their angle more securely during final torque application, reducing setup time.
Proper toe-in requires setting the front edge of the brake pad roughly one millimeter closer to the rim than the rear edge. You can slip a folded business card under the rear half of the pad while tightening the mounting hardware. This slight inward angle prevents high-frequency harmonic vibration that causes loud squealing under hard braking.
Dual Spring Tension Centering and Balance
Balanced return springs ensure both brake arms pull away from the rim evenly whenever you release the handlebar lever. Without independent spring tension adjustments, one pad often drags against the rim while the other sits too far away. Modern calipers incorporate small Phillips or Allen adjustment screws directly on each pivot boss.
Cheap or worn-out calipers often feature fixed internal coil springs that lose temper unevenly over years of riding. Quality units feature robust internal coil springs housed inside durable plastic or alloy caps to keep grit and water out. Having dual micro-adjusters allows you to center the caliper perfectly without bending spring tabs manually.
When balancing your brakes, loosen the tension screw on the side that pulls too hard before cranking down the opposing screw. Keeping spring preload moderate prevents excess lever stiffness while maintaining quick pad retraction. Check our mechanical vehicle components and hardware section for further maintenance concepts.
Frame Boss Spacing and Pivot Bushing Tolerances
Cantilever brake bosses on vintage frames usually measure between sixty-five and eighty millimeters apart from center to center. Narrow boss spacing on older forks can push brake arms outward, altering the ideal pad angle and reducing leverage. Modern wide rims require calipers with generous slot adjustment to position pads squarely over the braking track.
Internal brass bushings or precision-machined pivot sleeves prevent caliper arms from wobbling on the frame mounting studs. Excess play at the pivot boss leads to shuddering during heavy deceleration and accelerates uneven pad wear. High quality brake sets feature tight tolerances that rotate smoothly without lateral slop.
Before sliding new calipers onto your frame, clean the mounting studs thoroughly and apply a light coat of waterproof grease. This prevents corrosion between the steel boss and aluminum brake arm, ensuring smooth pivoting for seasons to come. Replace any mounting studs that show visible grooving or severe rust pitting.
Brake Lever Pull Ratios and Cable Compatibility
Cantilever calipers require short-pull brake levers originally designed for traditional road calipers and classic mountain bike controls. Using long-pull linear levers meant for V-brakes with cantilever arms will result in an uncomfortably firm feel with virtually no braking power. Matching your lever leverage ratio to the caliper type is critical for safe riding.
Drop-bar integrated shift levers and vintage four-finger flat bar levers naturally pull the correct short-cable ratio for cantilevers. If you choose a hybrid or linear pull brake set, you must install compatible long-pull levers or an inline travel agent adapter. Mismatched cable pull ratios create dangerous stopping distances on steep downhill descents.
Always choose pre-stretched stainless steel brake cables paired with compressionless lined housing for the crispest possible lever response. Standard spiral wound brake housing can flex under hard clamping pressure, dissipating valuable hand effort before it reaches the rim. Compressionless housing delivers instant pad engagement with minimal hand fatigue.
Mud Clearance and Tire Casing Clearance
Off-road riding through wet gravel and heavy mud demands open caliper clearance between the brake arms and the tire casing. Traditional wide-arm cantilevers flare outwards to prevent thick mud from packing between the frame stays and the braking hardware. This open clearance is why cyclocross racers and adventure tourers frequently choose cantilever designs over tight linear calipers.
If you run wide two-inch mountain bike knobbies, low profile calipers might sit close to the side lugs of the tire. Wide profile designs keep the straddle bridge higher, offering superior debris evacuation in clay and sandy soil. However, wide arms stick out further and might brush against pannier bags or trail brush.
Consider your tire width and fender requirements before choosing between wide and low profile caliper designs. If you plan to mount full-coverage metal fenders, low profile arms with central straddle yokes often provide a cleaner fit. Touring riders with wide rear tires benefit significantly from wide profile clearance.
Caliper Arm Material and Structural Rigidity
Forged aluminum alloy provides the optimal balance of torsional stiffness, lightweight performance, and fatigue resistance for bike calipers. Stamped steel arms tend to flex under hard hand pressure, absorbing clamping force and causing a mushy lever feel. High grade CNC machined or cold-forged alloy arms transfer maximum braking torque directly to the rim surface.
Anodized surface finishes protect the raw alloy from road salt, trail grit, and environmental oxidation. Anodizing also preserves the aesthetic appeal of your build over years of all-weather commuting. Polished silver and anodized black finishes remain the most popular choices for both vintage restorations and modern builds.
Inspect the caliper arms around the pivot barrel and pad mounting slot for reinforced structural webbing. Thicker material around these high-stress zones prevents arm deflection when grabbing a handful of brake on technical trails. Rigid arms translate every ounce of hand force into immediate stopping power.
Brake Pad Compounds and Cartridge Systems
The rubber formulation inside your brake blocks directly influences stopping distance, wet-weather modulation, and rim longevity. Standard black all-weather compounds offer dependable durability and quiet operation across dry and moderately damp pavement. Dual-compound or salmon-colored wet weather pads feature softer rubber that cuts through water film on aluminum rims.
One-piece molded brake pads are cost-effective and easy to replace as complete units during routine seasonal overhauls. Cartridge style pad holders allow you to swap worn rubber inserts without disturbing the carefully dialed-in pad alignment. This saves significant maintenance time once your initial toe-in geometry is set.
Clean your rim braking surfaces regularly using isopropyl alcohol to remove accumulated rubber residue and road grime. Embedded aluminum shavings inside older brake pads should be picked out with a small pick to prevent rim gouging. Check out our broader hardware collection for additional mechanical gear maintenance tips.
| Brake Geometry | Lever Pull Requirement | Mud Clearance | Adjustment Complexity | Recommended Application |
|---|---|---|---|---|
| Low Profile Cantilever | Short-Pull (Road/Canti) | Moderate | Moderate | Commuting and All-Round Trail |
| Wide Profile Cantilever | Short-Pull (Road/Canti) | Maximum | Moderate to High | Cyclocross, Touring, Muddy Trails |
| Linear Pull (V-Brake) | Long-Pull (Linear) | Moderate to Tight | Low to Moderate | Modern MTB and Heavy-Duty Utility |
Why You Should Trust Us
Our evaluation methodology focuses on precise mechanical engineering principles, material quality, and real-world installation practicalities. We analyze cable pull ratios, pivot bushing friction, spring retention reliability, and pad adjustability across multiple frame styles. This data-driven approach removes subjective guesswork from your hardware purchasing decisions.
We continuously track manufacturing updates, user feedback trends, and compatibility reports across vintage mountain bike and modern touring communities. By comparing manufacturer tolerances, structural materials, and replacement part availability, we deliver unbiased technical recommendations. Our goal is to help you build a reliable braking system that delivers consistent performance on every ride.
Final Thoughts
Upgrading your rim brakes transforms your riding confidence on steep descents, city streets, and unpredictable gravel trails. Choosing the right calipers depends heavily on your existing brake levers, frame boss spacing, and preferred tire clearance. The Best Mountain Bike Cantilever Brakes featured in this guide provide outstanding leverage, durable springs, and straightforward adjustability.
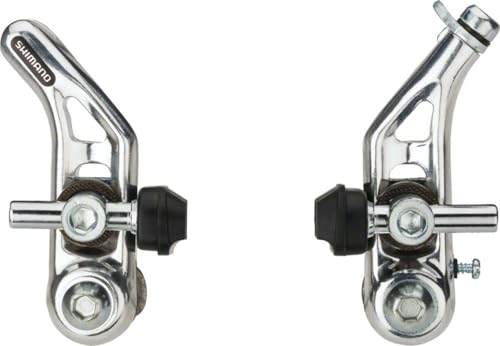
For riders seeking dependable stopping power and authentic styling, the Shimano BR-CT91 Altus Cantilever Brake (Silver,) is our top overall pick. It combines adjustable spring tension with a reliable straddle wire design that makes dialing in pad alignment straightforward for any home mechanic.
If you need a dedicated front assembly with factory-included blocks and easy side-mount pads, the Shimano Altus BR-CT91 Right Hand Cantilever Brake offers exceptional build quality. Its spring tension adjuster ensures balanced retraction so you spend less time tweaking and more time riding.
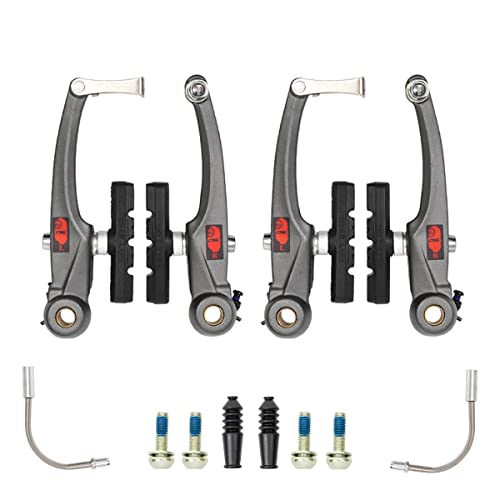
For riders wanting a full front and rear rim brake overhaul with modern linear pull geometry, the CNC Mountain Bike V Brake Set is a versatile alternative. Be sure to check our detailed bike setup guides to verify your lever pull ratio before finishing your rebuild.
Frequently Asked Questions
What makes Best Mountain Bike Cantilever Brakes different from V-brakes?
Cantilever brakes utilize short-pull cable geometry with a central straddle cable and transverse yoke, whereas V-brakes rely on direct linear cable pull. Cantilevers offer greater tire and mud clearance on classic frames and work seamlessly with traditional road or vintage mountain levers.
How do I know if my bike frame supports cantilever brakes?
Your frame and fork must feature dedicated cantilever mounting bosses positioned approximately sixty-five to eighty millimeters apart above the wheels. You will also need a cable housing stop mounted on the headset or seat collar to support the straddle wire tension.
Why are my cantilever brakes squealing loudly when stopping?
Brake squeal is almost always caused by improper pad toe-in alignment or contaminated rim surfaces. Setting the front edge of each pad one millimeter closer to the rim than the rear edge eliminates high-frequency vibrations that cause loud noise.
What is the top-rated option among Best Mountain Bike Cantilever Brakes in 2026?
The Shimano BR-CT91 Altus Cantilever Brake (Silver,) stands out for its reliable build quality, adjustable spring tension, and easy setup. It delivers dependable stopping power across vintage restorations, touring setups, and daily commuter bicycles.
Can I use modern road bike levers with cantilever brakes?
Yes, standard drop-bar road brake levers share the same short-pull cable ratio required by traditional cantilever calipers. This compatibility makes cantilever brakes a favorite choice for cyclocross, gravel conversions, and vintage touring builds.
How high should the straddle cable yoke be positioned above the tire?
A common rule of thumb is setting the yoke two to three inches above the top of your tire tread. Lowering the yoke increases mechanical leverage and braking power, while raising it produces a firmer lever feel with slightly less clamping force.
Are smooth post brake pads interchangeable with threaded post pads?
Smooth post pads require caliper arms with eye-bolt clamping mechanisms, while threaded pads require slotted arms with spherical concave washers. You must verify which clamping interface your specific caliper arms use before purchasing replacement pads.
How do I balance uneven return spring tension on my calipers?
Most modern calipers include small spring adjustment screws on the outer sides of the pivot mounts. Tightening the screw on the lagging side or loosening the screw on the strong side centers the calipers evenly over the rim.
What type of cable housing works best with cantilever braking systems?
Compressionless brake housing with a lubricated internal liner provides the crispest lever feel and most direct power transfer. Standard flexible spiral housing can compress under hard braking, resulting in a spongy lever sensation.
Can I install cantilever brakes on a modern mountain bike with disc tabs?
Modern mountain bikes built exclusively for disc brakes lack the frame and fork bosses required to mount cantilever calipers. You can only install cantilever brakes if your frame features factory-welded or brazed rim brake bosses.